Wednesday, September 3, 2014

An Updated Laundry Room...


I live in a house built in the 90s.  Back then someone had the genius idea of putting laundry rooms in the mud room/entry from the garage in almost every house from this era.  To me, this was the worst idea in home modeling.  I just love when people walk from the garage into our house and see all my dirty laundry strewn around.   Oh just step over my underwear, sorry about that.  Just awesome.   I have always hated this room in our house.  It is pretty small to do much with and for 9.5 years I just lived with it.   Here is a pic of it before.   I can't believe I am actually posting this for people to see...


Things I disliked:

  • I don't have any place to store anything.
  • The junky wire shelves that don't hide anything.
  • No place to fold clothes.
I started with wanting a countertop over the laundry machines.  I special ordered one from Lowes since I need a non-standard size of 36 inches deep to cover the full width of the machines and space from the wall.   The countertop only costs about $175, I thought that was a steal of a deal.

I also wanted some cabinets to help with storage.  I just purchased some pre-fab ones also from Lowes since I didn't need anything fancy.   I have never installed cabinets in my life.  My brother convinced me they were easy and I also found this super helpful YouTube video.  I love YouTube.


 Of course I tried to tackle this project by myself while home alone.  Smart, right?!?!  I started with a brand new stud finder.  Well, I couldn't find a stud.  At all.   Dug out my old stud finder.  The damn thing could only find one stud across a 100 inch wall.  Impossible.   I finally found another so I was able to hang the first upper cabinet as the video demonstrated.  I removed all the doors, pre-drilled the holes in the back, and had my level ready.   It was actually really, really simple to hang the first one.  I was pumped.


Then it was time for the second one.  Got all my prep ready, had the clamps standing by, and was ready to find the next studs.  Nothing again.  NOTHING.  Lots of swearing ensued.   Studs should be either 16 or 24 inches apart.  The only thing I could think of was that this room was different since it was designed as a laundry room.  I went for it and measured 16 inches from the last stud and then another 16 inches.  Drilled my holes and away I went....

This is wear I really, really, really should have had another set of hands.  Here I am holding this super heavy double cabinet while half standing on a step stool, half sitting on my washing machine trying to get it level.  Holy F! that was hard.  It was basically impossible. I finally got one screw in and quickly clamped it to the other one.   I went to drill the second hole and no stud.  WTF!!!  How is that even possible?!?  I was beyond frustrated, swearing, sweating, and exhausted from holding this damn thing up against the wall.  

I would recommend you don't remove the shelves in my cabinet. You will find many holes where I drilled trying to find a stud.  The  stud configuration of this room defied logic.     Thank goodness the shelving covers my mistakes....or the builders mistakes in my opinion.

Next was the countertop.  I pulled the washer and dryer out as much as I could and used two L shaped brackets to secure it to the wall.  More issues trying to find a stud.  More swearing and sweating.   I may have also chucked the stud finder as far as I could across the room.

After the brackets were in place, I needed to cut out a section of the counter for the water faucets. I used a jigsaw and it was super easy to cut through the counter.  I then had a GENIUS idea.  I flipped the cut piece over and it covers the open space.

You can see from the photo above that it looks liked I planned it that way.  That stroke of luck sort of made up for all of the bruises on my arms and legs.

I reassembled the laundry room.   I added a shelf between the cabinets and wall.   That too was very easy to cut to size with a jigsaw.   I also wanted to add handles to the doors of the cabinets since I knew for sure there would be dirty fingers on them.   I  had leftover handles from by kitchen project so I didn't have to buy anything special.

I think I measured them 10 times before I drilled the holes. I was so nervous that I would mess up the holes and then I would be really screwed.  But I did it!


 So here is the finished project.


It is such a major difference for this room.  I love it.   I cannot tell you how awesome it is to have a table to fold laundry. I used to just dump the clean clothes in baskets and they would sit there for weeks until I HAD to fold them and put them away.


Sunday, August 17, 2014

Let There be Light...

This spring and summer I have done a lot of searching for backyard ideas.  I really wanted a pergola over our patio.  Wouldn't something like this be beautiful?

http://www.pinterest.com/pin/549579960750162667/
 
 
I had a few companies provide quotes, however to the tune of $7,000 I couldn't quite take the plunge. $7,000 for a few pieces of cedar lumbar...I don't think so.  I  knew my family would be willing to help me build this for a fraction of the price.  So that is on hold until next summer.
 
During my searching for backyard ideas, I found this...
 
http://www.pinterest.com/pin/549579960750770962/
 

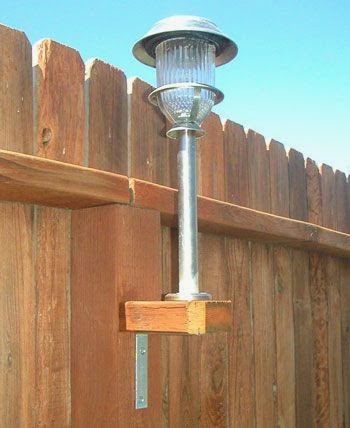
I figured I could easily do something like this on our fence.    I found packs of solar lights at Lowes for a decent price.  I went with 2 packs of 8 for a total of 16 lights.  The lights I found didn't have a base so I thought there had to be a better way.  I needed a semi-circle type of clamp that I could fasten to the front of the board.  I found some 3/4 inch copper pipe clamps in the plumbing section that worked perfectly.
 
To assemble my lights, I started by cutting a 2x4 into 16 chucks about 2 inches wide.  I also found some stain spray paint.  I was excited about that since I am always worried I am going to burn my house down with a spontaneous combusting stain rag.   


The stain said it would dry in 15 minutes.  LIES!  Look at how wet the blocks were after 4 hours.   So I let them dry overnight.  There were still a bit tacky, but not bad.  I don't have a lot of patience to wait so I used them tacky.

 
The blocks were easy to assemble. I used L brackets to attach them to the fence post and loosely fastened the pipe clamps to the blocks.  I was fine with the silver brackets and copper clamps.  You can't really see the silver once they are installed and I realty like the pop of color the copper gives the lights.
 

I screwed the L bracket to the fence first and then slide the light down into the clamp and tightened the screws.  I didn't want the light to stick over the top of the fence like the sample I found, so I moved them down.


We have lots of big Maple trees in our backyard, so I had to be strategic of where I placed them so they would get the most sunlight.  I tried to capture some pictures of what they looked like at night, but that was a bit of a challenge.


Here are some pics during the day.  I know, I  know they are hard to see.


I love how they turned out.  The lights give our backyard such a sophisticated feel and they really do give a good amount of light.  AND even better, I think I spent a total of $95 on this project.


Sunday, August 3, 2014

The End of the Grateful Dead Bears...


We moved into our house almost 10 years ago and at the time I was on a ban from any remodeling or home improvement projects.  Why a ban?  Well my husband couldn't handle any more of my disasters.  Examples...
  1. Hours and hours of painful wallpaper removal.
  2. Coming home to find his home office painted periwinkle blue (with a nice spill on white berber carpet covered up by a newly moved desk.)
  3. The brilliant idea that when the exterior of our house needed painting to change the color.  It went from chocolate brown to mint green.  I went for a sage and it turned out mint.  We were poor recently graduated college kids.  No way we could afford to repaint it.  Plus it took forever to paint.
  4. The fact that I replaced the trim boards in our kitchen with boards I cut on our living room floor with a hack saw.  No lie.  My dad fixed that one for us with proper 45 degree cuts, with a real saw.
  5. Painting our master bedroom twice.  First attempt was a bad green.  Note to self...don't attempt green paint.
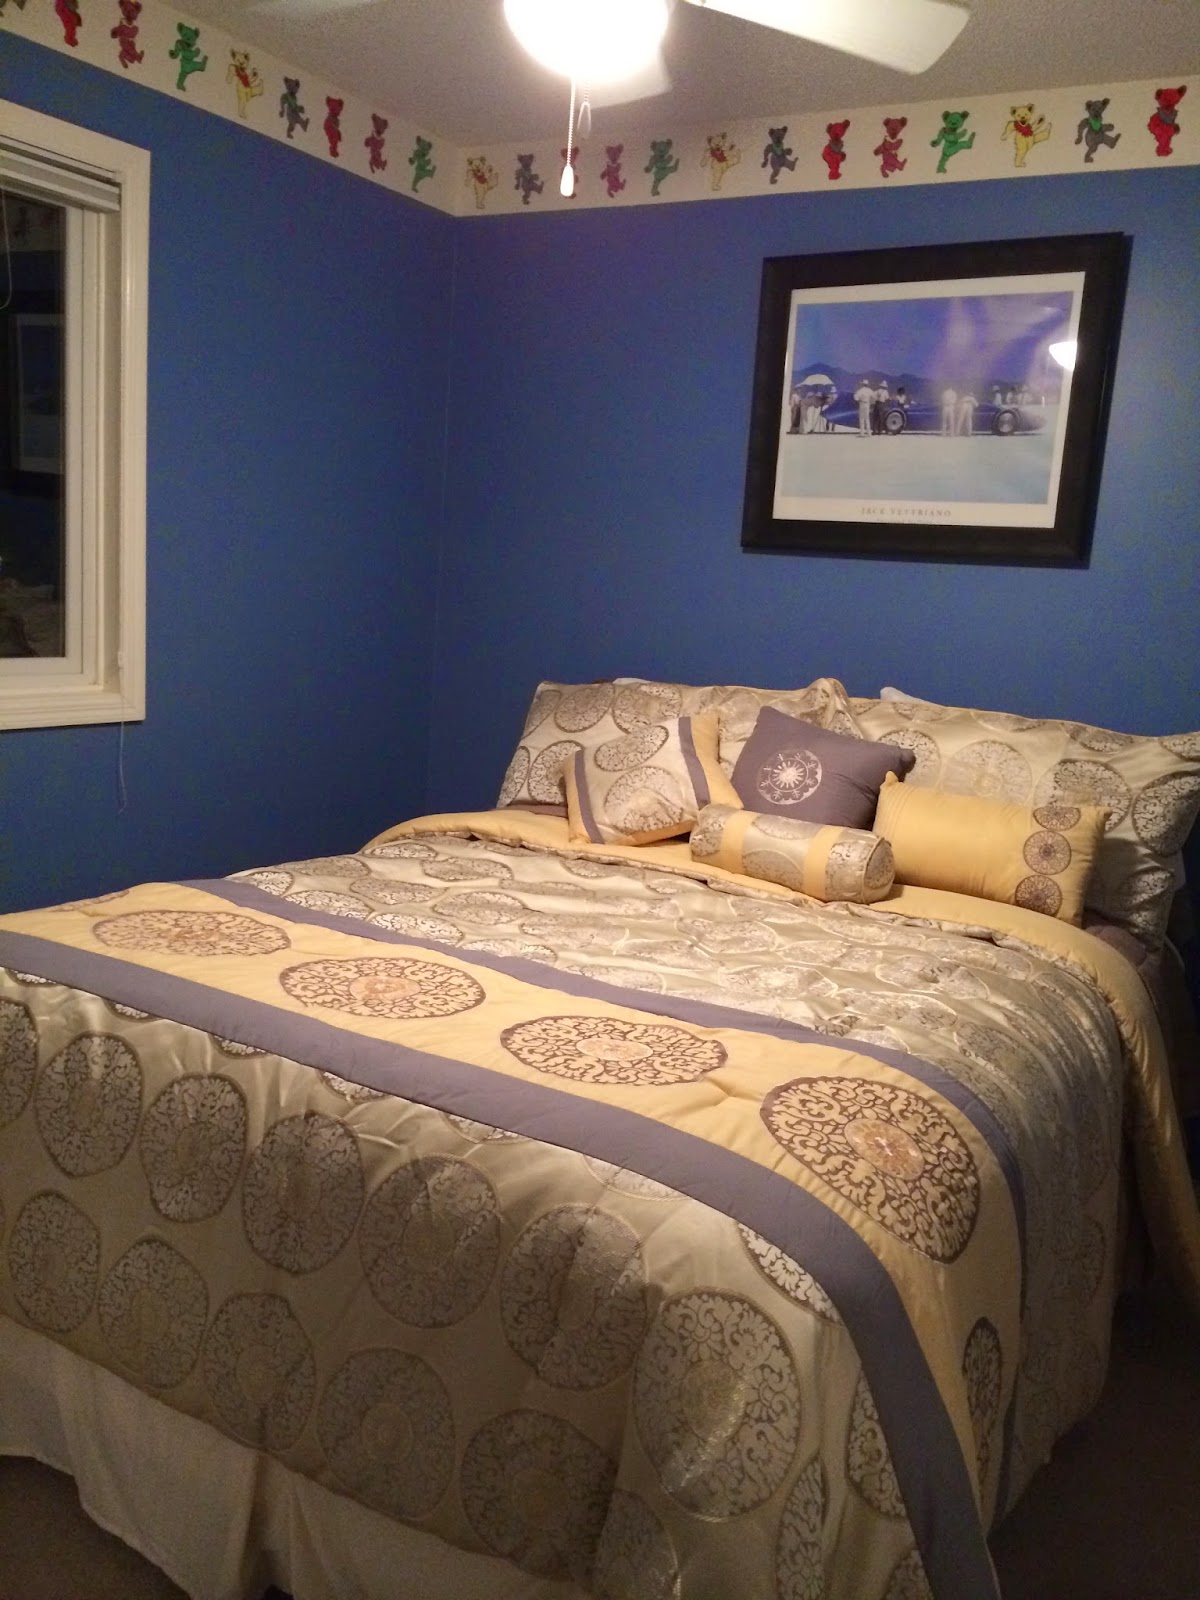
Well, this ban on any home improvement projects meant that I had to live with Grateful Dead Bears in the guest bedroom.  The previous owner had hand painted them in his son's room.    I hated these bears.   Every time I walked passed the room they taunted me...."You can't paint over me..." Eventually I gave up on them and ignored the taunts.

Here is a photo of the room before. 


The room isn't very large, so I wanted to make the space appear as large as possible. The wall color inspiration came from this photo I found on Pinterest.


I went with what I would describe as a robin's egg blue or even a Tiffany's blue.  I start by putting a coat of primer over the bears.  One coat of primer and 2 coats of paints covered them perfectly.

I searched for hours and hours online for headboard ideas. I wanted something unique.   I saw lots of people taking a panel door on its side as a headboard. 

http://www.pinterest.com/pin/549579960748854746/

But I wanted height to elongate the room.  Then I had a brilliant idea.  About a year after we moved in the house I thought I could break the no improvement rule and went out and bought all new 6 panel doors for the house.  Well I bought slab doors and not pre-hung.  So they literally have been sitting in my garage ever since.  Oops.   Well, I realized if I put two together, painted them bright white, and stood them behind the bed, it would be the focal point of the room I was looking for with a headboard.

I have to say it turned out better than I expected.  


I reused the bedding from the room before but added some throw pillows that matched the wall color perfectly.   I found small bedside lamps that pulled the gray from the bedspread. I found the pillows and lamps at Target.

For the side tables I used vintages one that were passed down to me from my Mom and Dad.  I love that they don't match; I am not a big fan of matchy-matchy.  I also added some grommet topped curtains and a clock.  I rehung the painting which was a gift from a good friend of mine.

Here are some more photos to give a better idea of the room.  It was hard to capture the color perfectly, so I tried different lighting.


And a final before and after:


Tuesday, July 29, 2014

A Pop of Color....

It is hard to scroll through the Home Décor section on Pinterest without seeing lots of pins of painted front doors.  I didn't realize my front door was boring until recently.  Here is proof, my before picture:


Driving around my neighborhood I saw lots of painted front doors. Most were actually red or a dark wine color.  I wanted the color to pop.  At first my thought was a navy blue, but I decided on a dark aqua color.

I have no patience so I immediately headed to Lowe's for paint and supplies.   I opted for exterior paint since it would be exposed to some wind, rain, and snow.  Well of course they only had the gallon size left in exterior paint.  Due to my non-existent patience, I bought a gallon.  I convinced myself I would use it on another project.   Aqua exterior paint....ok, sure I would.

But there was one problem.  This was 2 days before Thanksgiving and I live in Minneapolis.  My front door was frozen, there was no way I was going to be able to paint it.  Paint buying fail.

So it sat and sat in my closet until it finally warmed up....5 months later.

During my 5 month waiting period, I stumbled upon this little gem.


You can find these twine covered letters on Etsy for $25-$40, but it looked easy enough to recreate.   I found the paper mache letter, twine, and the ribbon at Jo-Ann Fabrics and the flower accents at Michaels.

This one was actually pretty time consuming to do!  I realized that having a last name that started with and S was not very advantageous as I tried to maneuver the curves.  Here are my tips if you try this one:
  • Be prepared for twine lint.  I have a dark brown couch and had little fuzzies everywhere.
  • I started with the flat part of the end of the S.  I covered that in little pieces across the top since I knew I would be covering the rest as I started the main part of the letter.
  • I used Tacky Glue to hold the twine in place at the start.
  • The corners/curves can be tricky and I had to double up in some sections to keep the twine straight once I got out of the curves.
After I was all done I thought to myself people are crazy to sell these for only $25!  I felt like it took forever to wrap that sucker.   For the decorations I used a hot glue gun to adhere them to the twine.  I also put little dabs on the back of the letter at the beginning and end of the twine to reinforce the hold. 

Here is a close up of the finished project.  I used a wreath holder which I had handy since Christmas was over and I was putting the decorations away.


Fast forward 5 months.

Basically the first nice day, I whipped open that gallon of paint and went at it!   I decided to use a foam paint brush so that there wouldn't be any streaks or brush strokes.   It took about 4 coats to get the color just right.   Here is the finished paint job:


After 5 months of waiting, I had the door fully complete. It turned out better than I expected and gives the front of the house a pop of color without being obnoxious.


 And ...I have an almost full gallon of paint.  Oops.


Monday, July 28, 2014

I Love the Smell of Coffee...

I should probably admit that I am addicted to Pinterest.  I could do spend hours just searching over everything and anything.

I had this coffee and candle vase pinned for months.  After looking at it over and over, I suddenly knew I needed to try and replicate it.  

My inspiration:


First off, I needed to find a glass vase/container.  I knew I didn't want one with a lid, that looked too messy.  I wanted it this to sit on a coffee table (no pun intended) and didn't want to be chasing beans all over the house.  I found mine at Jo-Ann Fabrics back in the floral section.  They actually have lots of different sizes and shapes.   In fact, I even got the candle there. I chose a birthday cake vanilla scented one.

And the most important part...the coffee.  The smell of coffee brewing and even coffee beans themselves have to be one of my top 5 scents.  To me there is something peaceful and soothing about the smell of coffee.  To really get the strong coffee smell, I headed over to Caribou Coffee to get their dark roast beans.  Yes, it was a lot more expensive to buy three bags of coffee from a coffee house but it was well worth it.

Here is my finished project.


Sorry for the bad lighting, but you get the idea.   I love it.  It is in the living room near the front door to our house and you get a whiff of coffee when you walk in the door.  Every time I vacuum I give the beans a swirl to bring out the scent even more.  I do have to admit that I haven't lit the candle yet. It is just to cute to disturb.

First Post...

I had never thought about starting a Blog before, but I have had a few people love my DIY adventures (yes, some are really adventures) that I thought I would share my trials, tribulations and SUCCESSES!

I won't promise to have the best grammar or the best photos, but I will try to limit my swearing to when absolutely necessary.

Oh, and don't worry it won't be all DIY projects, I will also share some of my loves for food and fashion.  There will be some posts on the Pug in my life too; he really should have his own blog.  The titles of the posts would be something like:
  • The time I broke into my neighbor's house and ran out with a homemade tortilla
  • I love to use the bathroom in front of school buses full of kids
  • The time I almost killed myself in the Kmart parking lot
  • The time I ate not one, but two cupcake wrappers at the park
  • The time I ate a whole banana bread
  • I love standing around in parks searching for things, but it may look like I am stalking kids
....I really could go on and on about him.   But look at that face!!!